
Debugging CheerpJ
How to properly debug CheerpJ in the browser
Sometimes, you might encounter issues or experience unexpected behavior when using CheerpJ. Don’t worry if that happens — this guide will help you troubleshoot the problem and gather essential resources, in case you need further assistance with debugging.
What to do if my application does not work with CheerpJ?
The reason your application isn’t working could be quite simple. Try these checks to ensure you’ve deployed and integrated CheerpJ correctly:
- You integrated CheerpJ into your web page by adding a
<script>tag like this:
<script src="https://cjrtnc.leaningtech.com/4.3/loader.js"></script>- The location of your JARs is correct and the prefix
/app/is added when passing it tocheerpjRunJarorcheerpjRunMain. For more information visit the virtual filesystem guide. - Your Java application functions normally on your local machine without CheerpJ.
- You are not opening the page by double-clicking on it; instead, you are using an HTTP server.
- Your application files are hosted using an HTTP server and are accessible through the browser.
If your application passes all these checks but still isn’t working correctly, you may need additional assistance from us. You can request help through our Discord server.
If you do so, make sure to provide additional context, such as a HAR file and the browser’s console output. This will make it easier for us to assist you. Instructions on how to generate these are provided in the following steps.
HTTP limitations
Some CheerpJ features require a secure context![]() (HTTPS). When the application is accessed over HTTP, browsers enforce serious limitations on certain browser APIs. For example, the clipboard API used by
(HTTPS). When the application is accessed over HTTP, browsers enforce serious limitations on certain browser APIs. For example, the clipboard API used by clipboardMode: "permission" is only available over HTTPS. When accessed over HTTP, users can only copy and paste text to the page itself and will have to double press Ctrl+C and Ctrl+V (Cmd+C and Cmd+V on macOS).
To resolve this issue:
- Use an HTTPS proxy to serve your application.
- Enable the page as a secure context using browser settings.
Enable advanced debug logs in CheerpJ
Before saving the browser console output, it might be helpful to enable advanced debug logs in CheerpJ using the enableDebug CheerpJ initOption.
cheerpjInit({ enableDebug: true });This option enables advanced debug logging, which is helpful for troubleshooting certain issues with CheerpJ. It provides a lot of extra information in case an actual error occurs and will speed up the process of solving the problem you are encountering.
Adding this option is not always necessary, but in some cases, these advanced logs are helpful if the normal console log does not provide any useful information.
Heads upEnabling debug mode can significantly affect performance. Disable it when not needed.
Saving the browser console output
You can follow these steps to save the browser console output:
- Open your browser and navigate to the application that you are testing with CheerpJ.
- Open the developer tools in your browser. You can do that by pressing F12 on your keyboard. Alternatively you can click on the three dots on the top right corner of your browser, select More tools and then click Developer Tools.

- Once the developer tools are open, navigate to the Console tab. If you can’t see the Console tab, you might need to clik on the + symbol in Edge, or the >> symbol in Chrome, and then select Console.
- If needed, trigger the error in your application.
- To save the console output, right click on any message in the console tab and select Save as…
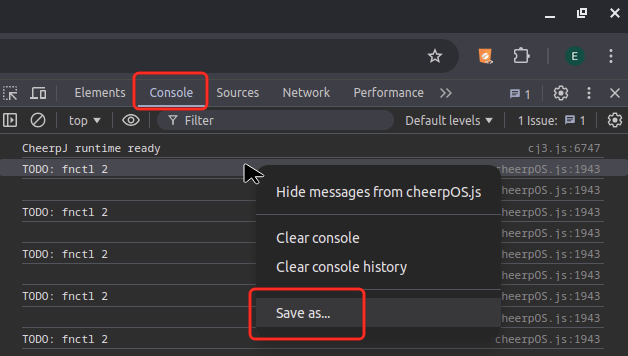
- You can now save the console log to a file and forward it to us.
Extracting a HAR file
A HAR file (HTTP Archive file) is a log of a web browser’s interaction with a website. They are very useful for debugging web applications, as they help us diagnose issues related to loading times, network errors, or incorrect responses from a server.
You can save a HAR following these steps:
- Open the developer tools in your browser. You can do that by pressing F12 on your keyboard. Alternatively you can click on the three dots on the top right corner of your browser, select More tools and then click Developer Tools.
- Now navigate to the application that you are testing with CheerpJ. Or if you already visited the page, reload it. This is to make sure the HAR file will be complete and no entries are missing.
- Navigate to the Network tab in the developer tools. If you can’t see the Network tab, you might need to clik on the + symbol in Edge, or the >> symbol in Chrome, and then select Network.
- If needed, trigger the error in your application.
- To download the HAR file you need to click the download icon ↓ at the top right of the networking tab.
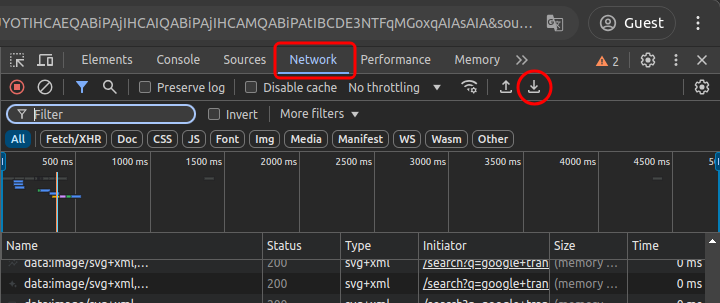
- You can now save the HAR file and forward it to us to us in Discord or via Github.