
Filesystem
Interacting with the virtual filesystem in CheerpJ
CheerpJ provides a virtual filesystem that allows Java applications to read and write files within a secure, browser-sandboxed environment. For browser security reasons, code running in the browser cannot access the user’s local disk directly. Instead, all file operations are confined to a virtual space, which provides multiple mounting points, each with a specific purpose and access model.
Mounting points overview
The virtual filesystem structure looks like this:
/├── app/├── files/│ ├── downloads/│ └── uploads/└── str//app/— Read-only mount that points to the root of your web server. Java can read files using the/app/prefix./files/— A persistent, Java read-write area and the default mounting point for Java. JavaScript can read via CheerpJ APIs./files/uploads/— Files uploaded from the local machine via the upload button on any Java window’s title bar land here automatically./files/downloads/— Files saved here by Java are automatically downloaded to the user’s local machine (into the browser’s default download directory).
/str/— A transient mount used to pass data from JavaScript to Java. JavaScript can read and write, Java can only read. Not persisted.
If a file is served by your HTTP server (e.g., alongside your JARs), your Java code can read it via the /app prefix. For any other local files, it is necessary to load them into the virtual filesystem first. CheerpJ provides several ways to move files into and out of this virtual filesystem, ranging from built-in UI interactions to JavaScript APIs.
The uploads and downloads directories are only available in versions CheerpJ 4.3 and higher
For a detailed overview of mounting points (/app/, /files/, /str/) and how they work, see the File and Filesystem guide.
Importing files to the virtual filesystem
When the user needs to provide local files to the Java application, CheerpJ offers several methods to load them into the virtual filesystem. The simplest requires no custom code at all.
Method 1: Using the window title bar upload button
Supported in CheerpJ 4.3 and later versions
Any CheerpJ window with a title bar includes an upload button (upward arrow icon) in the top-right corner. Clicking it opens the browser’s native file picker, allowing the user to select a file from their local machine. The selected file is automatically placed into /files/uploads/ and becomes available to the Java application immediately. No JavaScript is required.
Uploads are not persistentFiles imported this way will be available in the virtual /files/uploads/ directory. Please note that files imported to /files/uploads/ are not persistent and will be gone upon browser restart.
While this upload button is present on all windows with a title bar, using it from a JFileChooser or any file open/import dialog is often the most convenient approach, as users are already intending to interact with files in that context.
Method 2: Using cheerpOSAddStringFile (string or binary)
The quickest way to place a file into CheerpJ’s virtual filesystem from JavaScript is cheerpOSAddStringFile. It’s ideal for string content and also supports binary data via Uint8Array.
When to call it: Invoke cheerpOSAddStringFile after cheerpjInit() finishes (i.e., once its Promise resolves). The API depends on the runtime and virtual filesystem being fully initialized.
// Call this only after cheerpjInit() has resolved.function addStringFileToCheerpJ() { const fileName = "default.txt"; const content = "Default content."; cheerpOSAddStringFile(`/str/${fileName}`, content); console.log(`File "${fileName}" added to /str/.`);}Entries you create under /str/ (from JavaScript) are readable from Java as regular files. Remember: /str/ is not persisted and is read-only from Java.
import java.nio.file.Files;import java.nio.file.Path;/*Rest of your Java code...*/String text = Files.readString(Path.of("/str/fileName.txt"));System.out.println(text);Method 3: Using library mode
When a file already lives under /app/ but your Java code needs to read it as if it were in /files/ (i.e., without the /app/ prefix), use Library Mode to copy it across mounts. With cheerpjRunLibrary, you can invoke Java’s java.nio.file from JavaScript to copy the file from /app/… to /files/…, after which the application can open it using just its bare filename.
async function copyFileToFilesMountPoint() {  // Library mode can be created before or after cheerpjInit  const lib = await cheerpjRunLibrary(""); // Create a library mode object  const Files = await lib.java.nio.file.Files;  const StandardCopyOption = await lib.java.nio.file.StandardCopyOption;  const Paths = await lib.java.nio.file.Paths;
  const source = await Paths.get("/app/notes_tmp.txt");  const target = await Paths.get("/files/notes_tmp.txt");
  try {    await Files.copy(source, target, [StandardCopyOption.REPLACE_EXISTING]);    console.log("Copied /app/notes_tmp.txt to /files/notes_tmp.txt");  } catch (e) {    console.error("Error copying file:", e);  }}
// Then, initialize CheerpJ and run your Java applicationasync function cj3init() {  await cheerpjInit({    version: 8,  });  // cheerpjCreateDisplay(...) and cheerpjRunMain(...) go here}cj3init();copyFileToFilesMountPoint();// Your Java app can now access "notes_tmp.txt" by simply calling `new File("notes_tmp.txt")`// without needing the /app/ prefix.
Downloading files from the virtual filesystem
When Java runs under CheerpJ, files are saved to the virtual filesystem (default /files/), not the user’s disk. CheerpJ provides several ways to deliver these files to the user’s local machine.
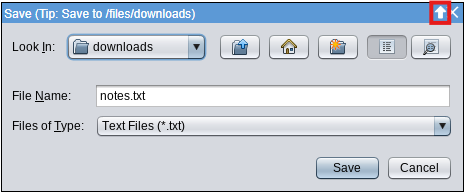
Method 1: Saving to /files/downloads/
Supported in CheerpJ 4.3 and later versions
The simplest way to offer a file download requires no custom JavaScript. Any file that the Java application saves under /files/downloads/ is automatically downloaded to the user’s local machine (into the browser’s default download directory).
When saving or exporting from within the application, make sure the destination path is /files/downloads/. For example, from Java:
import java.io.File;import java.io.FileWriter;import java.io.IOException;
// Writing to /files/downloads/ triggers an automatic browser downloadFile file = new File("/files/downloads/report.txt");try (FileWriter writer = new FileWriter(file)) {    writer.write("Report content here.");} catch (IOException e) {    System.err.println("Error writing file: " + e.getMessage());}
If your application uses JFileChooser for save/export dialogs, the user can also navigate to /files/downloads/ manually to trigger the browser download after saving.
Method 2: Using cjFileBlob
Use the JavaScript-accessible cjFileBlob API to extract files from the virtual filesystem and trigger a browser download programmatically. Java writes the file into /files/, and JavaScript reads it and triggers a download.
<button id="download">Download file</button><script type="module">  document.getElementById("download").addEventListener("click", async () => {    try {      const fileName = "example.txt"; // written by Java      const path = "/files/" + fileName;      const blob = await cjFileBlob(path); // read from VFS      const url = URL.createObjectURL(blob);
      const link = document.createElement("a");      link.href = url;      link.download = fileName;      link.click();
      URL.revokeObjectURL(url);      console.log(`Successfully downloaded ${fileName}`);    } catch (e) {      console.error("Error downloading file:", e);    }  });</script>
Method 3: Call a JavaScript native method from Java
Use this when the Java code should decide when to trigger the download. Java writes the file to /files/ and calls a native method (implemented in JavaScript) to perform the browser action.
Java Writes the File and Calls a Native Method
// Declare the native methodpublic static native void downloadFileFromCheerpJ(String filePath);/*Rest of your Java code...*/try {    // You can also use "example.txt" since it defaults to the /files/ mount point    File file = new File("/files/example.txt");    FileWriter writer = new FileWriter(file);    writer.write(content);    writer.close();
    // Pass the actual file path to the native method    downloadFileFromCheerpJ(filepath);
} catch (IOException e) {    System.err.println("Error generating or writing file: " + e.getMessage());}
JavaScript Implements the Native Method and Downloads the File
Now we’ll implement the native method downloadFileFromCheerpJ in JavaScript to process the file. The function receives the file path from Java, uses CheerpJ’s cjFileBlob() to get the file’s content, and then triggers a download using standard browser APIs.
// Native method implementation called from Java// Naming: Java_<fully-qualified-class>_<method>async function Java_App_downloadFileFromCheerpJ(lib, fileName) {  try {    // Read the file from CheerpJ's virtual filesystem as a Blob    const blob = await cjFileBlob("/files/" + fileName);
    // Create an invisible link    const link = document.createElement("a");    link.href = URL.createObjectURL(blob);    link.download = fileName;
    // Simulate a click on the link and clean up objects    link.click();    link.remove();    URL.revokeObjectURL(link.href);
    console.log(`Successfully downloaded ${fileName}`);  } catch (e) {    console.error("Error downloading file:", e);  }}
// Initialize CheerpJ and register the native methodasync function cj3init() {  await cheerpjInit({    // Register native method    natives: { Java_App_downloadFileFromCheerpJ },  });  // cheerpjCreateDisplay(...) and cheerpjRunMain(...) go here}cj3init();
Special Case: Applets using showDocument()
For Applets, AppletContext.showDocument() can be used as a lightweight workaround to trigger downloads. This can be handy, but the native-method approach remains more flexible and robust for most cases.
Method 1: Direct URL download
If the file is already available at a public URL (e.g., on your server), point showDocument() at that URL.
// Java Applet Codeprivate void downloadDirectURL() {  try {    // Assumes 'filename.txt' is in the same directory as the applet JAR    URL fileUrl = new URL(getCodeBase()+"filename.txt");    getAppletContext().showDocument(fileUrl, "_blank");
    System.out.println("Triggered direct URL download: " + fileUrl.toString());  } catch (Exception ex) {    ex.printStackTrace();  }}
Method 2: Execute JavaScript for dynamic content
You can use showDocument() to execute arbitrary JavaScript code that then handles a download. This is less common but can be useful for passing dynamically generated content from Java to JavaScript for download.
// Java Applet Codeprivate void downloadViaJavaScriptShowDocument() {  try {      String content = "Dynamic content generated in Java!";      String encodedContent = URLEncoder.encode(content, "UTF-8").replace("+", "%20"); // Encode for URL      AppletContext context = getAppletContext();
      // Call a JavaScript function 'downloadFromJava' and pass content      context.showDocument(new URL("javascript:downloadFromJava('" + encodedContent + "')"));      System.out.println("Triggered JS download via showDocument.");  } catch (Exception ex) {      ex.printStackTrace();  }}
And in your HTML, you’d have the downloadFromJava JavaScript function:
// JavaScript in applet.htmlfunction downloadFromJava(encodedContent) {  try {    const content = decodeURIComponent(encodedContent);    const blob = new Blob([content], { type: "text/plain" });    const url = URL.createObjectURL(blob);
    // Create an invisible link    const link = document.createElement("a");    link.href = url;    link.download = "applet_showdocument_dynamic.txt";
    // Simulate a click on the link and clean up objects    link.click();    link.remove();    URL.revokeObjectURL(url);
    console.log("File downloaded via showDocument");  } catch (e) {    console.error("Error downloading file:", e);  }}